Gallery
Gallery
top
rig breakdown
Lazy Susan Rig
by:
Brendan Riel
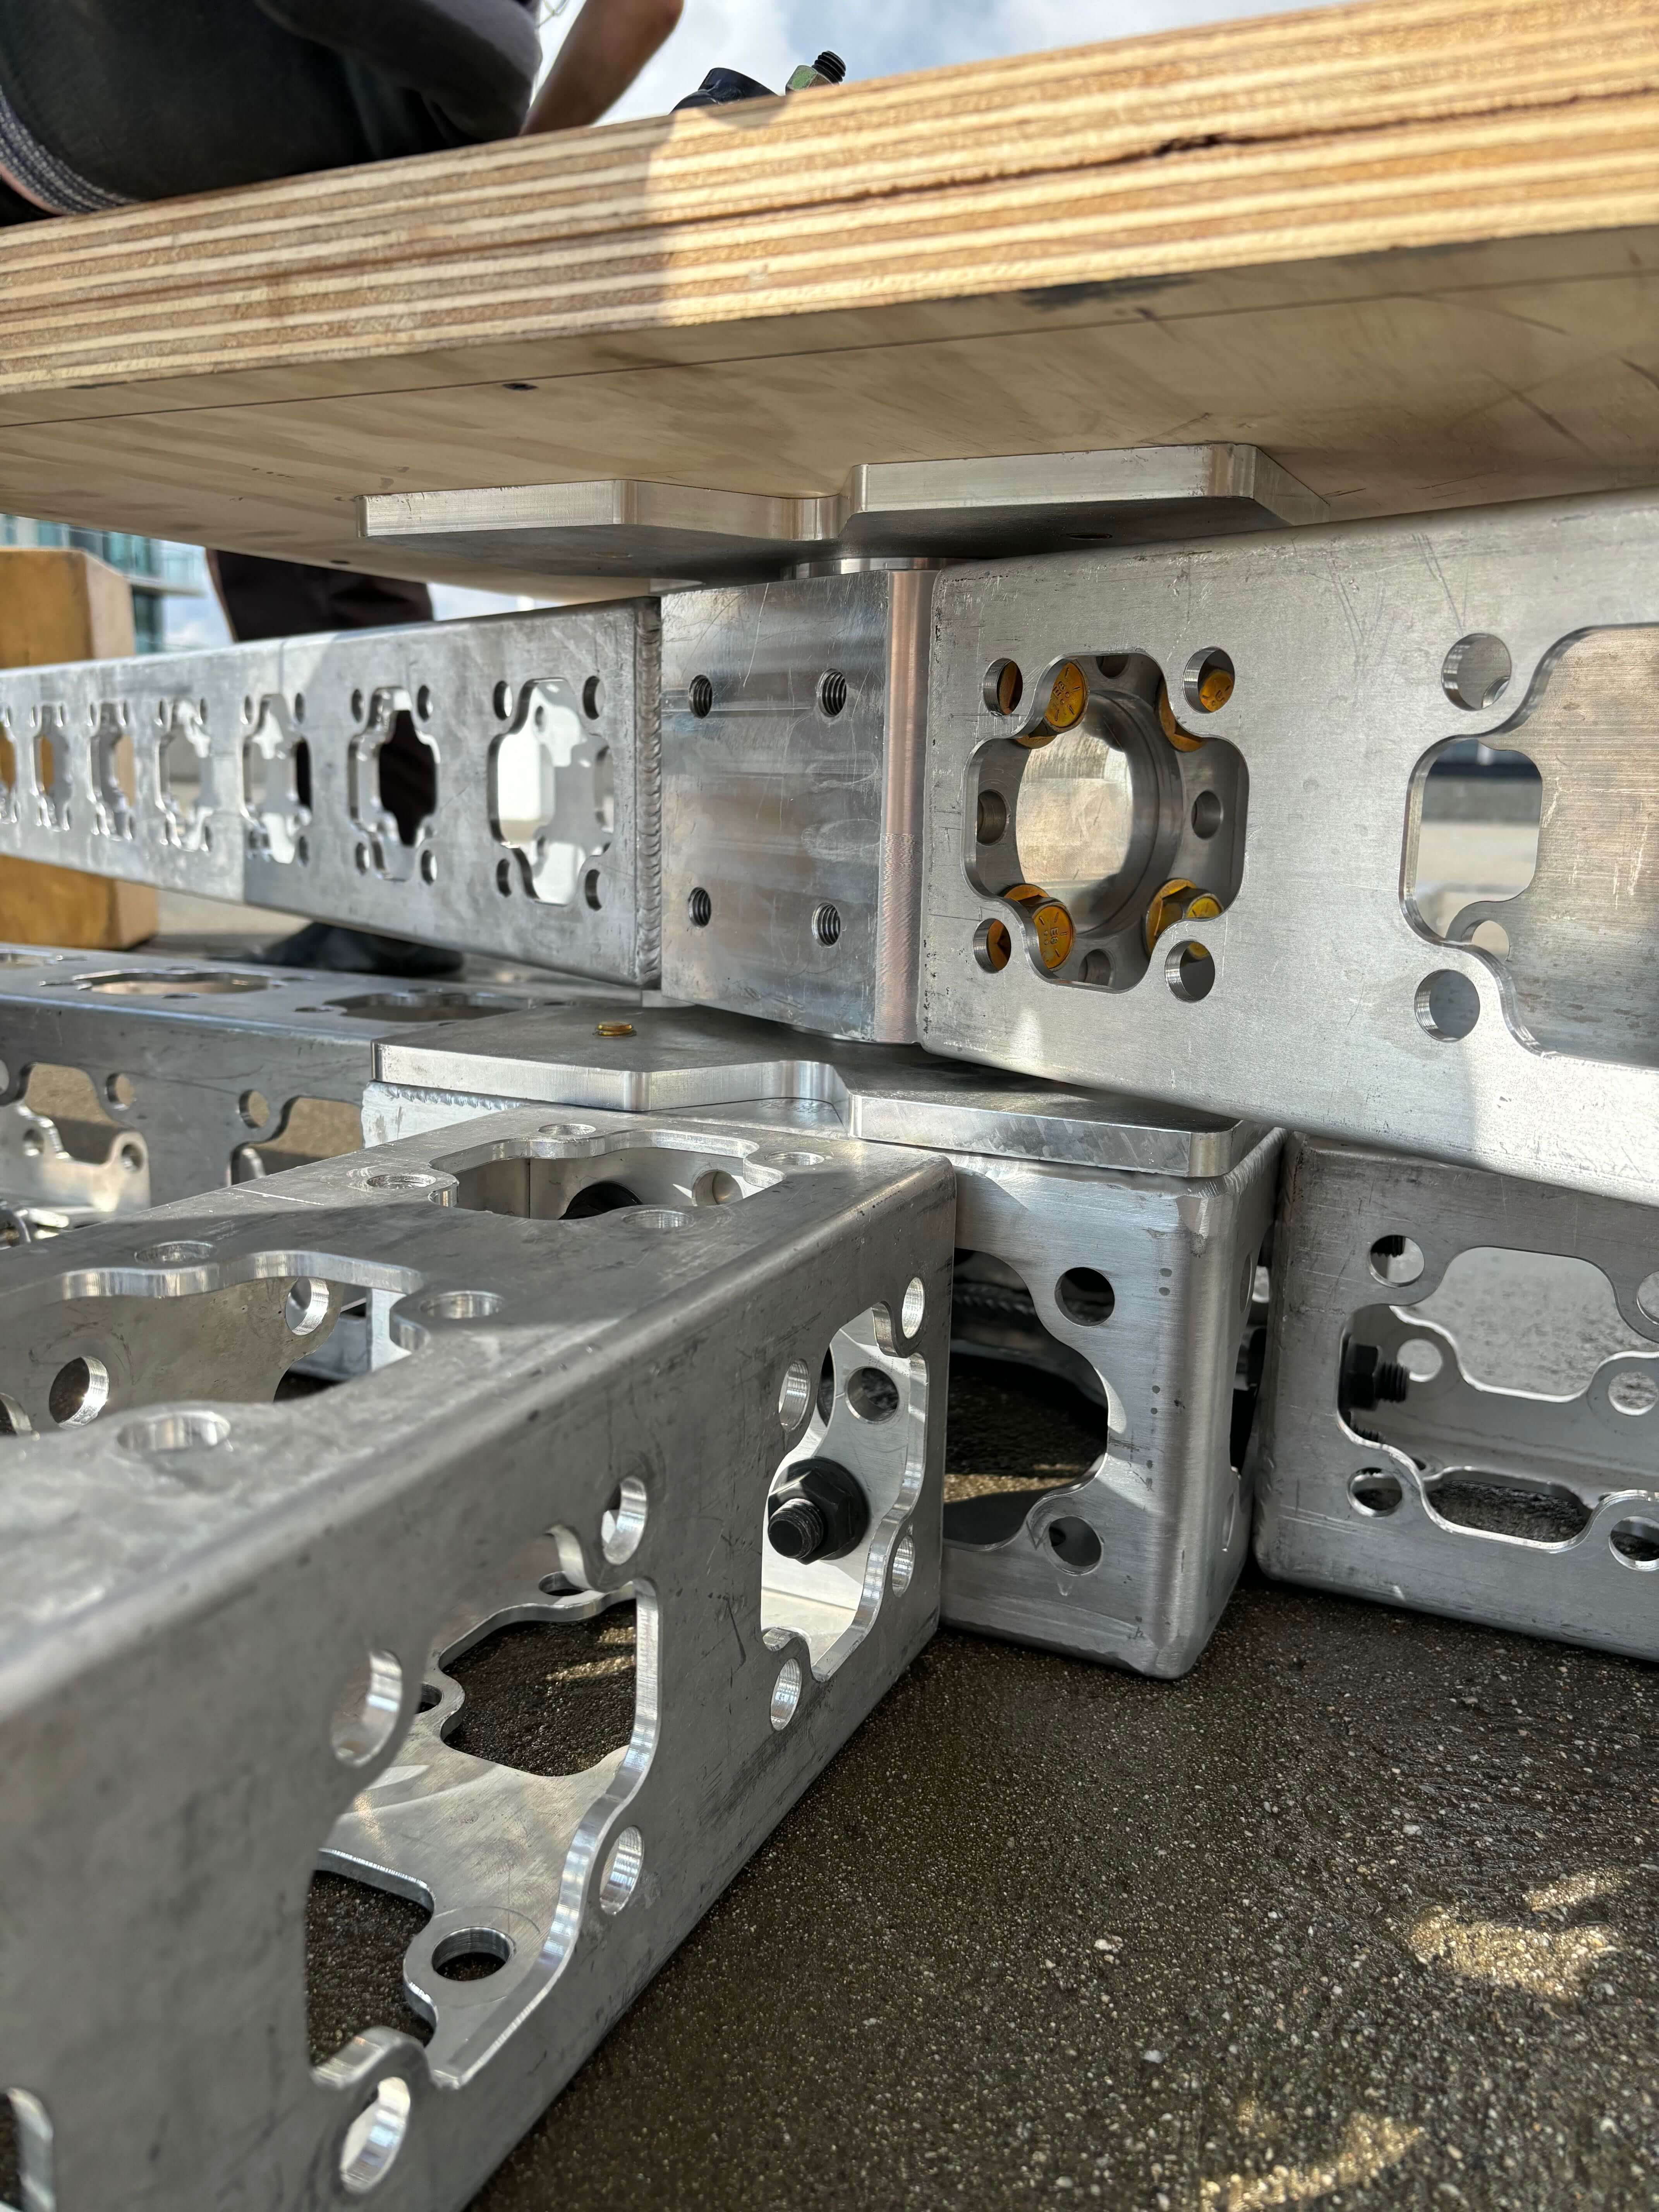
Modulus-X 6” lazy susan rig built with truss from Division Rentals in Los Angeles. Their custom lazy susan bearing only spins in the middle and keeps the top and bottom plates static.
Read >
rig breakdown
ModX Rolling Soft Toplight
by:
Brendan Riel
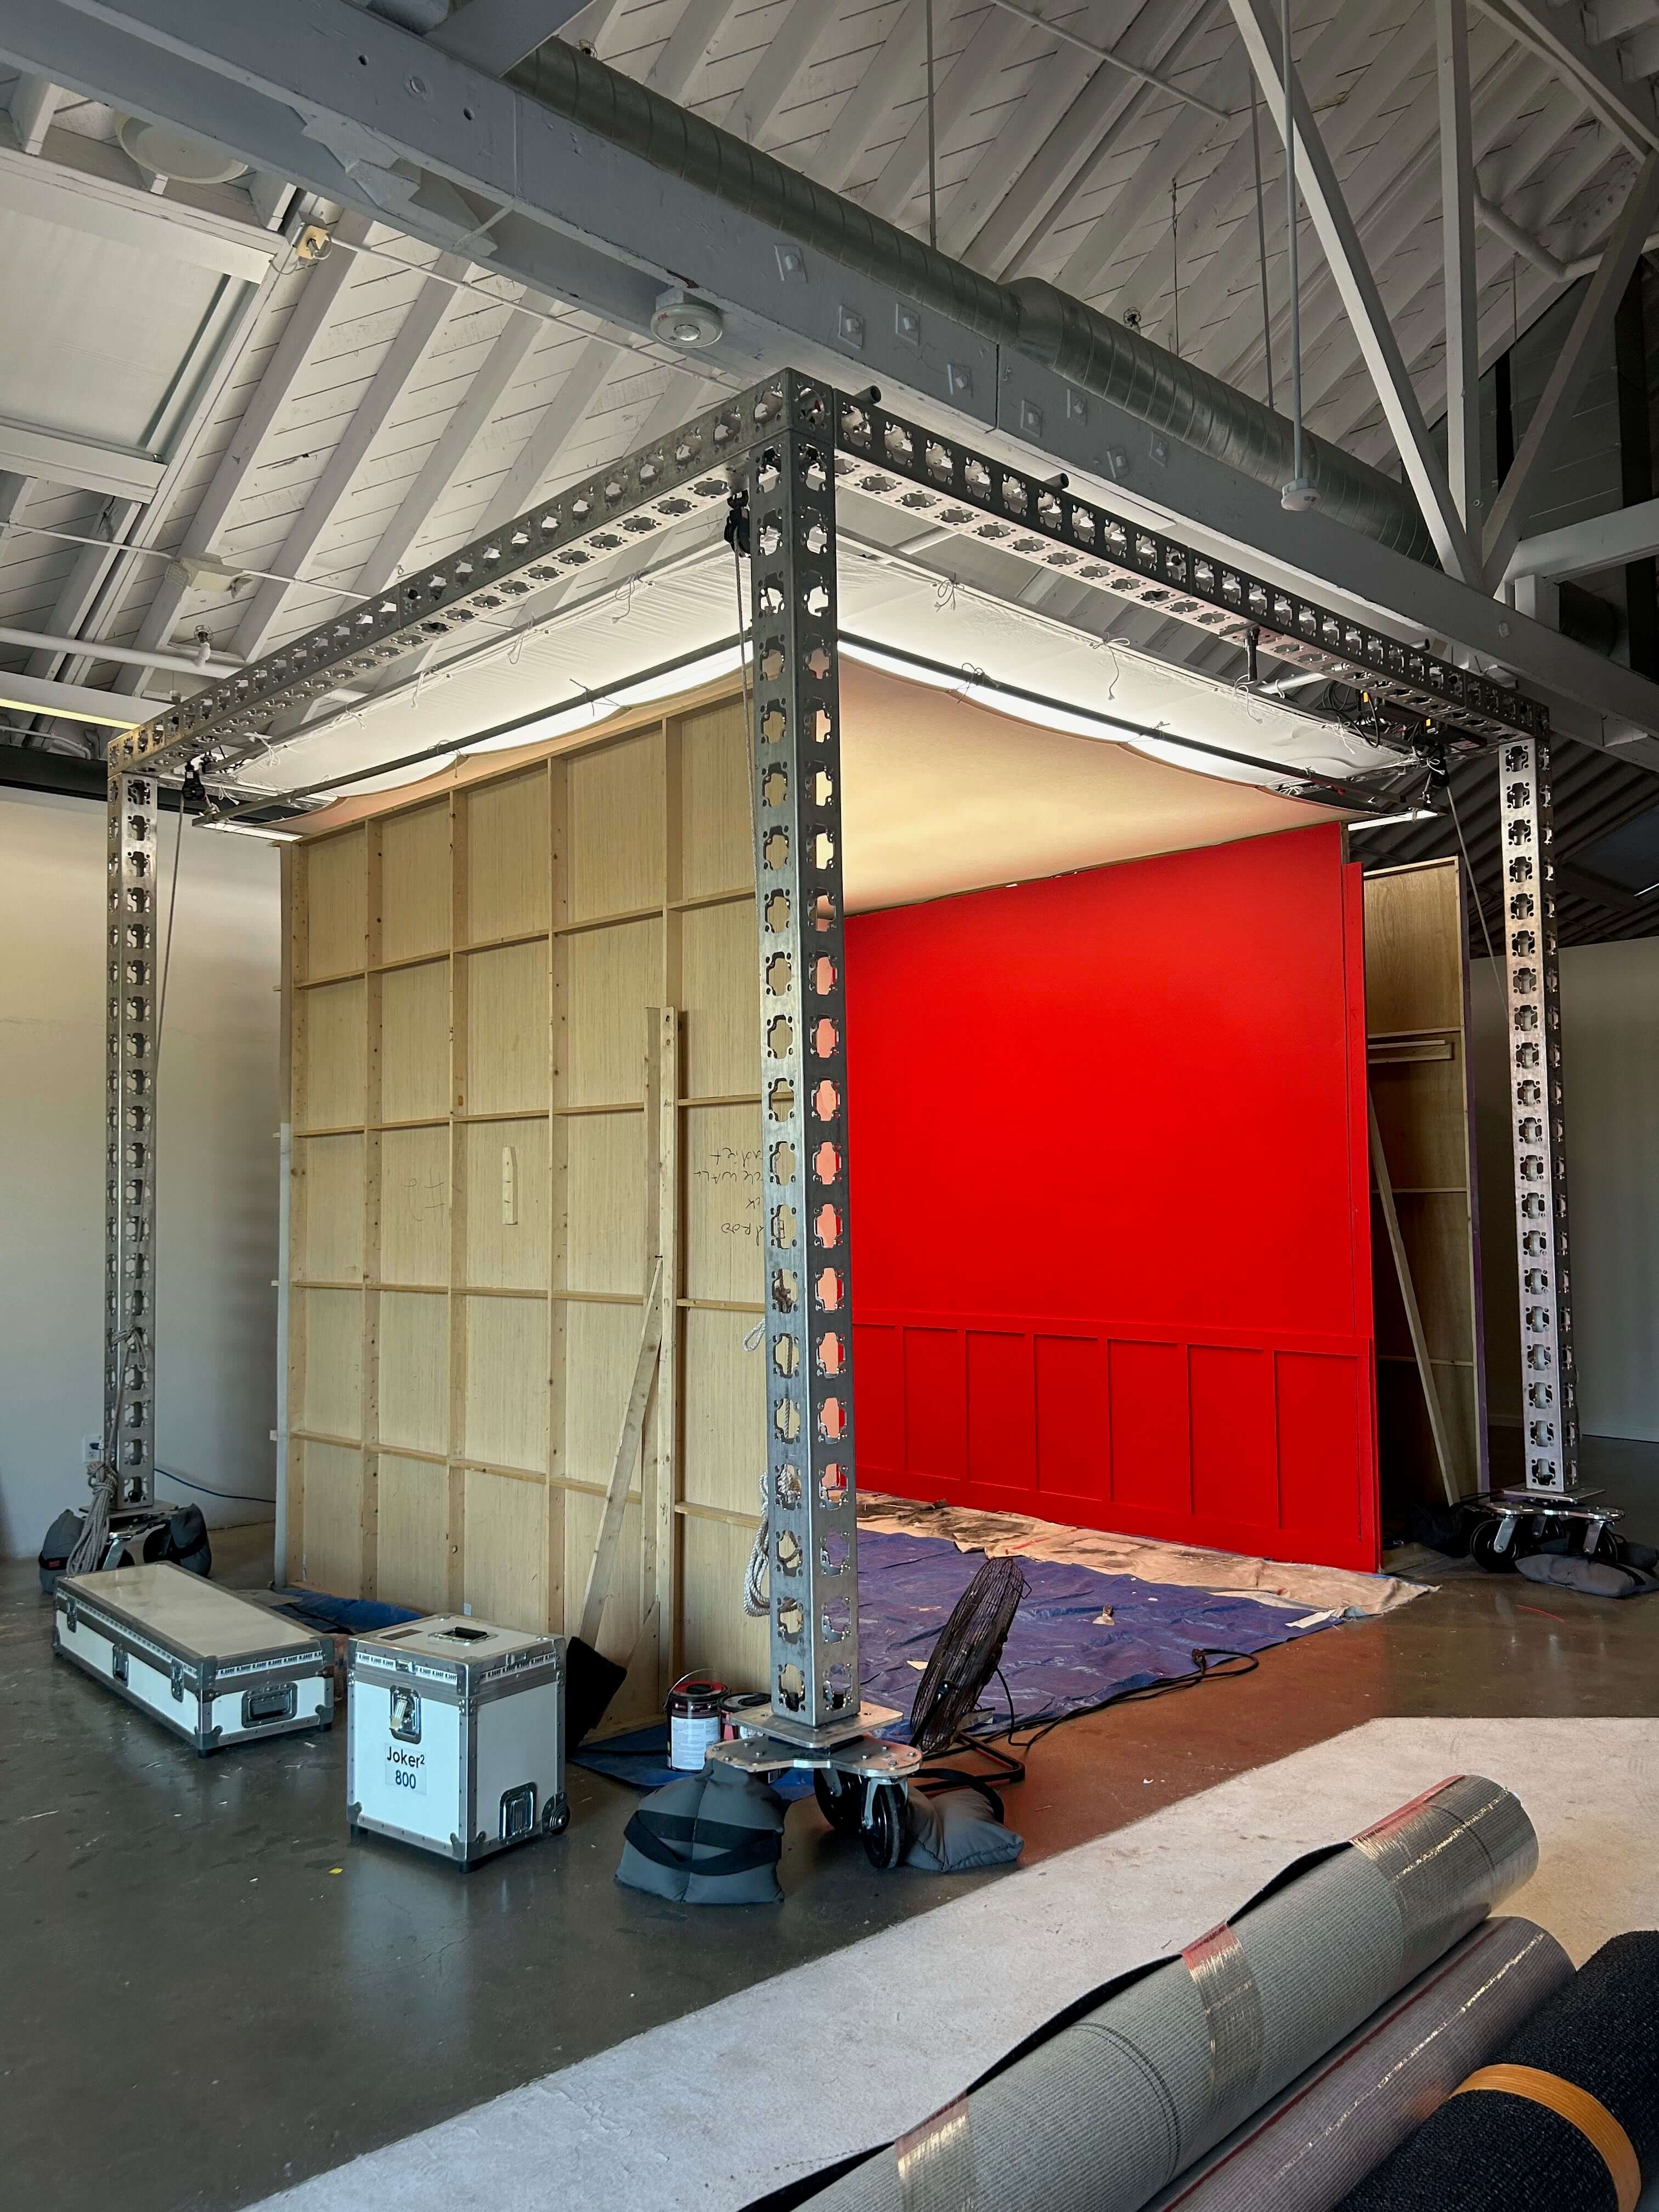
We built this mobile toplight softbox using 6" ModX truss to serve four different sets inside a tight studio space with limited overhead clearance. The goal was to keep costs down and avoid building duplicate overhead rigs or ground units for each set. So, we designed a rolling, double-layered softbox that could easily move from set to set—and double as an in-frame ceiling piece when needed.
The structure measured 14’x14’ OD and held two 12x12 frames: one with 1/2 grid and one with bleached muslin. The bleached muz was rigged with a pulley system, allowing us to raise or drop the rag when we needed to bring it into the scene as a ceiling element. We punched LiteTile through both rags for soft, consistent coverage.
For mobility, we mounted the whole rig on C&C Studio Services tri-casters.
Read >
rig breakdown
Laptop Closing Camera Rig
by:
Brendan Riel
Director wanted a shot that looked like it was a laptop closing.
We could have attached a GoPro or similar action camera to a laptop and done it that way but we wanted to preserve image quality and use our cinema A cam - the Alexa mini.
We opted instead to build a custom rig that mimicked the motion of a closing laptop and put the camera in a POV of the action. In doing this we were able to redefine the movement and make it work exactly how we wanted it to, providing greater flexibility.
For example - our starting height wanted to be a little below eye level and our arcing motion allowed us to see more of the keyboard.
We counterbalanced the rig to get us even smoother motion.
Read >

rig breakdown
Counterbalanced Guitar Rig
by:
Brendan RIel
Counterbalanced guitar rig with auto-tilt.
The goal was to rig the camera to the end of the guitar to see the tuning knobs and the neck. We couldn’t drill into the guitar at all which left very limited options for rigging. Couldn’t bite onto anything on the neck because we’d see the clamp.
To rig a shot like this traditionally you would rig a few points off the neck or body of the guitar to the camera and support the weight of the camera. This makes it hard to operate the shot because you need to support the camera and awkwardly maintain the angle as the guitar moves around. Controlling the movement of the guitar is tough in this instance.
For this rig we created an inner ring and an outer ring both built out of speedrail. Almost like a dumb version of a gimbal with no motors. The inner ring was free to pivot on the x axis to allow the camera to tilt up and down independent of the rig’s vertical movement. This meant that as the rig got higher, the camera would tilt down. If the rig got lower the camera would tilt up. The tilt was in relation to the angle of the guitar - it wasn’t something the operator had to control.
You could raise and lower the rig by holding onto the outer ring without having to worry about whether you were aiming the camera straight down the neck of the guitar - it did it for you.
Ran a pulley from the top of our rig up and over to some counterbalance to make up and down movement effortless.
Read >

rig breakdown
Vehicle Rig With Hard Mounts & Suctions
by:
Brendan Riel
Pulled the bumper for this rig to access hard mounts on the frame. Integrated speed rail starter onto the frame and built out with speedrail and hollaenders.
Used over unders for our main hard mounted support piece to add rigidity. Could have used steel pipe but we didn’t have any on hand.
Triangulated near the camera mounting position with more speedrail to 10” & 6” suction cups.
Sometimes when doing vehicle rigs I like to ommit using any sort of leveling head and just mount the dovetail straight to a cheeseplate. I find those mini ball heads slip unless you can triangulate the crap out of them and this is sometimes a better solution.
At the end we put the bumper back on.
Read >

rig breakdown
Water Bottle Camera Rig
by:
Brendan Riel
Water bottle rigged to a Sony FX3. We used 5/8” rods & hardware to secure this water bottle to the camera for a series of shots.
This rig lived in 2 variations: the handheld variation and the handheld variation rigged to a bike. We wouldn’t normally do bike rigs like this but we kept the handheld rig together so we could match the same exact frame for match cuts in post.
Utilized an end jaw cardellini to clamp the bottle, 5/8” rods and modern studio hardware, 9. Solutions 5/8 gags, and LA Rag House 2” mighty mini grip heads. Secured into the camera with stubby baby pins, making sure not to protrude into the camera body.
Read >
rig breakdown
Lazy Susan Rig
by:
Brendan Riel
Modulus-X 6” lazy susan rig built with truss from Division Rentals in Los Angeles. Their custom lazy susan bearing only spins in the middle and keeps the top and bottom plates static.
Read >
rig breakdown
ModX Rolling Soft Toplight
by:
Brendan Riel
We built this mobile toplight softbox using 6" ModX truss to serve four different sets inside a tight studio space with limited overhead clearance. The goal was to keep costs down and avoid building duplicate overhead rigs or ground units for each set. So, we designed a rolling, double-layered softbox that could easily move from set to set—and double as an in-frame ceiling piece when needed.
The structure measured 14’x14’ OD and held two 12x12 frames: one with 1/2 grid and one with bleached muslin. The bleached muz was rigged with a pulley system, allowing us to raise or drop the rag when we needed to bring it into the scene as a ceiling element. We punched LiteTile through both rags for soft, consistent coverage.
For mobility, we mounted the whole rig on C&C Studio Services tri-casters.
Read >
rig breakdown
Laptop Closing Camera Rig
by:
Brendan Riel
Director wanted a shot that looked like it was a laptop closing.
We could have attached a GoPro or similar action camera to a laptop and done it that way but we wanted to preserve image quality and use our cinema A cam - the Alexa mini.
We opted instead to build a custom rig that mimicked the motion of a closing laptop and put the camera in a POV of the action. In doing this we were able to redefine the movement and make it work exactly how we wanted it to, providing greater flexibility.
For example - our starting height wanted to be a little below eye level and our arcing motion allowed us to see more of the keyboard.
We counterbalanced the rig to get us even smoother motion.
Read >
rig breakdown
Counterbalanced Guitar Rig
by:
Brendan RIel
Counterbalanced guitar rig with auto-tilt.
The goal was to rig the camera to the end of the guitar to see the tuning knobs and the neck. We couldn’t drill into the guitar at all which left very limited options for rigging. Couldn’t bite onto anything on the neck because we’d see the clamp.
To rig a shot like this traditionally you would rig a few points off the neck or body of the guitar to the camera and support the weight of the camera. This makes it hard to operate the shot because you need to support the camera and awkwardly maintain the angle as the guitar moves around. Controlling the movement of the guitar is tough in this instance.
For this rig we created an inner ring and an outer ring both built out of speedrail. Almost like a dumb version of a gimbal with no motors. The inner ring was free to pivot on the x axis to allow the camera to tilt up and down independent of the rig’s vertical movement. This meant that as the rig got higher, the camera would tilt down. If the rig got lower the camera would tilt up. The tilt was in relation to the angle of the guitar - it wasn’t something the operator had to control.
You could raise and lower the rig by holding onto the outer ring without having to worry about whether you were aiming the camera straight down the neck of the guitar - it did it for you.
Ran a pulley from the top of our rig up and over to some counterbalance to make up and down movement effortless.
Read >
rig breakdown
Vehicle Rig With Hard Mounts & Suctions
by:
Brendan Riel
Pulled the bumper for this rig to access hard mounts on the frame. Integrated speed rail starter onto the frame and built out with speedrail and hollaenders.
Used over unders for our main hard mounted support piece to add rigidity. Could have used steel pipe but we didn’t have any on hand.
Triangulated near the camera mounting position with more speedrail to 10” & 6” suction cups.
Sometimes when doing vehicle rigs I like to ommit using any sort of leveling head and just mount the dovetail straight to a cheeseplate. I find those mini ball heads slip unless you can triangulate the crap out of them and this is sometimes a better solution.
At the end we put the bumper back on.
Read >
rig breakdown
Water Bottle Camera Rig
by:
Brendan Riel
Water bottle rigged to a Sony FX3. We used 5/8” rods & hardware to secure this water bottle to the camera for a series of shots.
This rig lived in 2 variations: the handheld variation and the handheld variation rigged to a bike. We wouldn’t normally do bike rigs like this but we kept the handheld rig together so we could match the same exact frame for match cuts in post.
Utilized an end jaw cardellini to clamp the bottle, 5/8” rods and modern studio hardware, 9. Solutions 5/8 gags, and LA Rag House 2” mighty mini grip heads. Secured into the camera with stubby baby pins, making sure not to protrude into the camera body.
Read >

rig breakdown
Top Thrill 2 Roller Coaster Rig
by:
Brendan Riel
Rollercoaster rig for Top Thrill 2’s media day. This ride went 120mph and was Cedar Points newest and baddest ride. Camera pointing forward and another pointed backward at the news reporters.
Flew in with gear packed into pelicans. Travelled light but efficient with DP Jeff Nolde’s complete coaster rigging package.
Ratcheted all our parts to the coaster multiple ways, multiple directions. Coaster had holes under the seats we slid speedrail through and ratcheted it down. Hard mounted off that for added security. Ball leveling heads for the cameras and obviously an extreme amount of triangulation.
Read >

rig breakdown
Mountain Bike Camera Rig
by:
Brendan Riel
Sony RXO II mounted to a mountain bike.
This bike flew down the mountain at Griffith Park. Couldn’t use any form of attachment that would fall off easily such as a cardellini. Those and other type of hand tightening clamps loosen up over time with vibration. We opted instead to go with hose clamps.
Mounted small bicycle starters (I see where they get their name now) to the frame and made sure to protect the bike. Made sure all rigging was out of the way of the pedal and foot motion and triangulated the crap out of it.
Read >

By subscribing you agree to with our privacy policy and provide consent to receive updates from our company.
Legacy Grip 2025 All Rights Reserved
By subscribing you agree to with our privacy policy and provide consent to receive updates from our company.
Legacy Grip 2025 All Rights Reserved
By subscribing you agree to with our privacy policy and provide consent to receive updates from our company.
Legacy Grip 2025 All Rights Reserved
By subscribing you agree to with our privacy policy and provide consent to receive updates from our company.
Legacy Grip 2025 All Rights Reserved